Create an Elegant Bee Card with the NEW Stampin’ Hot Foil System
There’s always a little excitement that comes with opening a brand-new crafting tool. At the same time, it’s natural to wonder where to begin and whether it will be as easy to use as you hope.
That was exactly how I felt when I sat down to create one of my very first projects with the new Stampin’ Up! Hot Foil System. The good news? After making a few projects, I discovered that creating beautiful foiled designs is much easier than I expected.
For today’s project, I chose a clean, neutral colour palette of Golden Glow, Crumb Cake and Basic White to let the beautiful gold foiling take centre stage. The result is an elegant card that would work for birthdays, thank you cards or many other occasions. See the palette below.
If you’re completely new to the Hot Foil System, I’ve already put together a detailed overview that explains how it works, what’s included, answers common questions and shares additional samples. You can read that article here.
Today I’d like to show you how I used it to create this elegant bee card while sharing a few tips I learned along the way that will help you get beautiful foiled results too.
Create an Elegant Foiled Bee Card

I wanted my first Hot Foil project to focus on the foiling itself, so I kept the design clean and uncluttered. The gold foiled greeting becomes the focal point, while the sweet little bee and soft floral background add just enough detail without competing for attention.
This is also one of those cards that could easily be adapted for many different occasions. Simply change the greeting and you have a birthday card, thank you card, thinking of you card or even a note of encouragement.
Why I Chose This Colour Combination
One of my favourite things about this project is the colour combination. Golden Glow adds warmth and coordinates beautifully with the gold foil, while Crumb Cake keeps everything soft and neutral. Together they create a classic look that’s elegant without being overpowering.
Because the colours are fairly neutral, this design works beautifully for both masculine and feminine cards. It’s also a wonderful example of how a limited colour palette can allow one special element—in this case, the gold foiling—to really shine.

What Machine Can I Use?
One of the questions I’ve been asked most often is whether you have to use the Stampin’ Up! Stampin’ Cut & Emboss Machine.
Stampin’ Up! recommends using the Stampin’ Cut & Emboss Machine because that’s the machine they designed and tested the Hot Foil System with.
If you already own another die-cutting machine with an opening of at least 6-1/4″, the Hot Foil System should fit. Just keep in mind that Stampin’ Up!’s warranty applies when the system is used with the Stampin’ Cut & Emboss Machine.
 A Few Things I Learned While Using the Hot Foil System
Every new tool has a bit of a learning curve, and the Hot Foil System is no different. After making a few projects, I quickly discovered a handful of little tips that made a big difference.
- Take your time as you roll the Hot Foil System through the Stampin’ Cut & Emboss Machine. A slow, steady pass helps ensure every part of your design transfers beautifully.
- You can use almost any cardstock for foiling, but I found the new Two-Tone Cardstock gave me especially clean results—perfect for detailed greetings like the one I used on this card.
- If you notice a little foil transfer where you didn’t want it, don’t panic! A Mono Sand Eraser makes it easy to gently remove those little marks.
- Don’t worry if your first project isn’t perfect. Like any new technique, every project helps build your confidence.
- Save leftover pieces of foil—they’re perfect for smaller greetings and accents on future projects.
They’re all simple tips, but together they made a noticeable difference in my results.
Jenn Tip: Add a Few White Highlights
One of my favourite finishing touches is adding a few tiny highlights with a White Gel Pen. It only takes a minute, but it helps bring stamped images to life and adds a little extra dimension. On this bee, those small highlights really make the wings and body pop against the neutral background. See it listed with the other supplies below.
Take a Look at the Foiling
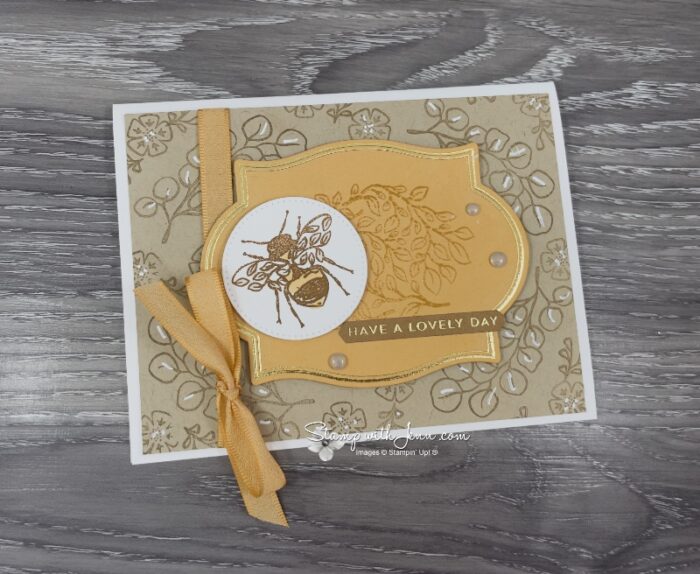
One thing that’s difficult to capture in photographs is just how beautifully the gold foil catches the light. This side view gives you a better idea of the shine and dimension the Hot Foil System creates. It’s one of those techniques that looks even more impressive in person.
Project Measurements
Card Base: 5-1/2″ x 8-1/2″, scored at 4-1/4″
Golden Glow: 4 1/4″ x 3 1/4″
Die-Cut Basic White Circle: 2″ x 2″
Pecan Pie Greeting: scraps
Ribbon: 14″ (less if you tie into a knot instead).

If you’ve been thinking about trying the new Stampin’ Up! Hot Foil System, I hope today’s project gives you the confidence to dive in. Like any new tool, there’s a small learning curve, but once you’ve created your first project, you’ll quickly discover just how enjoyable it is to add elegant metallic details to your handmade cards.
If you give this project a try, I’d love to see your version! Feel free to leave me a comment below or share your finished card with me.
Product List
![Flourish & Frames Bundle [ 170061 ]](https://assets1.tamsnetwork.com/images/EC042017NF/170061s.jpg "Flourish & Frames Bundle [ 170061 ]")
![Flourish & Frames Photopolymer Stamp Set [ 170062 ]](https://assets1.tamsnetwork.com/images/EC042017NF/170062s.jpg "Flourish & Frames Photopolymer Stamp Set [ 170062 ]")
![Crumb Cake Classic Stampin' Pad [ 147116 ]](https://assets1.tamsnetwork.com/images/EC042017NF/147116s.jpg "Crumb Cake Classic Stampin' Pad [ 147116 ]")
![Golden Glow Classic Stampin' Pad [ 167676 ]](https://assets1.tamsnetwork.com/images/EC042017NF/167676s.jpg "Golden Glow Classic Stampin' Pad [ 167676 ]")
![Crumb Cake 8-1/2" X 11" Cardstock [ 120953 ]](https://assets1.tamsnetwork.com/images/EC042017NF/120953s.jpg "Crumb Cake 8-1/2\" X 11\" Cardstock [ 120953 ]")
![Pecan Pie Classic Stampin' Pad [ 161665 ]](https://assets1.tamsnetwork.com/images/EC042017NF/161665s.jpg "Pecan Pie Classic Stampin' Pad [ 161665 ]")
![Basic White 8 1/2" X 11" Cardstock [ 159276 ]](https://assets1.tamsnetwork.com/images/EC042017NF/159276s.jpg "Basic White 8 1/2\" X 11\" Cardstock [ 159276 ]")
![Golden Glow 8 1/2" X 11" Cardstock [ 167685 ]](https://assets1.tamsnetwork.com/images/EC042017NF/167685s.jpg "Golden Glow 8 1/2\" X 11\" Cardstock [ 167685 ]")
![Pecan Pie 12" X 12" (30.5 X 30.5 Cm) Two Tone Cardstock [ 166688 ]](https://assets1.tamsnetwork.com/images/EC042017NF/166688s.jpg "Pecan Pie 12\" X 12\" (30.5 X 30.5 Cm) Two Tone Cardstock [ 166688 ]")
![Stampin' Cut & Emboss Machine [ 149653 ]](https://assets1.tamsnetwork.com/images/EC042017NF/149653s.jpg "Stampin' Cut & Emboss Machine [ 149653 ]")
![Stylish Shapes Dies [ 159183 ]](https://assets1.tamsnetwork.com/images/EC042017NF/159183s.jpg "Stylish Shapes Dies [ 159183 ]")
![Stampin' Hot Foil System Na & Craft Class [ 170009 ]](https://assets1.tamsnetwork.com/images/EC042017NF/170009s.jpg "Stampin' Hot Foil System Na & Craft Class [ 170009 ]")
![Flourish & Frames Hot Foil Dies [ 170064 ]](https://assets1.tamsnetwork.com/images/EC042017NF/170064s.jpg "Flourish & Frames Hot Foil Dies [ 170064 ]")
![Sweetly Sentimental Hot Foil Dies (English) [ 170052 ]](https://assets1.tamsnetwork.com/images/EC042017NF/170052s.jpg "Sweetly Sentimental Hot Foil Dies (English) [ 170052 ]")
![Gold Stampin' Hot Foil Rolls [ 170066 ]](https://assets1.tamsnetwork.com/images/EC042017NF/170066s.jpg "Gold Stampin' Hot Foil Rolls [ 170066 ]")
![Golden Glow Stampin’ Blends Combo Pack [ 167682 ]](https://assets1.tamsnetwork.com/images/EC042017NF/167682s.jpg "Golden Glow Stampin’ Blends Combo Pack [ 167682 ]")
![Crumb Cake Stampin' Blends Combo Pack [ 154882 ]](https://assets1.tamsnetwork.com/images/EC042017NF/154882s.jpg "Crumb Cake Stampin' Blends Combo Pack [ 154882 ]")
![Golden Glow 3/8" (1 Cm) Bordered Ribbon [ 167548 ]](https://assets1.tamsnetwork.com/images/EC042017NF/167548s.jpg "Golden Glow 3/8\" (1 Cm) Bordered Ribbon [ 167548 ]")
![Pearls Of Beauty [ 167098 ]](https://assets1.tamsnetwork.com/images/EC042017NF/167098s.jpg "Pearls Of Beauty [ 167098 ]")
![White Gel Pens [ 166642 ]](https://assets1.tamsnetwork.com/images/EC042017NF/166642s.jpg "White Gel Pens [ 166642 ]")
![Bone Folder [ 102300 ]](https://assets1.tamsnetwork.com/images/EC042017NF/102300s.jpg "Bone Folder [ 102300 ]")
![Take Your Pick [ 144107 ]](https://assets1.tamsnetwork.com/images/EC042017NF/144107s.jpg "Take Your Pick [ 144107 ]")
![Paper Trimmer [ 152392 ]](https://assets1.tamsnetwork.com/images/EC042017NF/152392s.jpg "Paper Trimmer [ 152392 ]")
![Detail Scissors [ 170902 ]](https://assets1.tamsnetwork.com/images/EC042017NF/170902s.jpg "Detail Scissors [ 170902 ]")
![Stampin' Seal [ 152813 ]](https://assets1.tamsnetwork.com/images/EC042017NF/152813s.jpg "Stampin' Seal [ 152813 ]")
![Stampin' Dimensionals [ 104430 ]](https://assets1.tamsnetwork.com/images/EC042017NF/104430s.jpg "Stampin' Dimensionals [ 104430 ]")