
Barbie Handmade Shaker Card
 I had so much fun making this Barbie card on my last Facebook live (see the video below). I might have even sung to the Barbie soundtrack as I made the card.
I explained on the video that I wanted to make a shaker card, as I love the new Iridescent Shaker Circles, and thought they would be perfect for a shaker card.

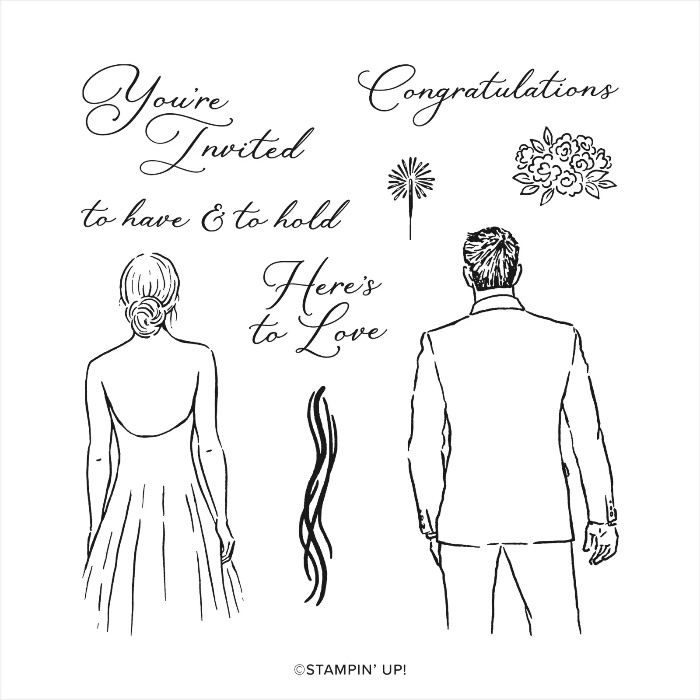
And then, I got this idea when thinking about a wedding card, where the “bride” image from the Here’s to Love stamp set would make a perfect Barbie (and ooh also Ken…more on that later).
 The bride’s dress became a pink glittery Barbie dress. I love the little rhinestone belt I made. And it might be hard to tell in the photo, but I covered Barbie’s Melon Mambo dress with a thick coat of Wink of Stella, which is very shimmery in person. The Iridescent Shaker Circles, dress, and belt add shimmer and glamour to the card, and the ribbon has a nice shiny silver thread running through it.
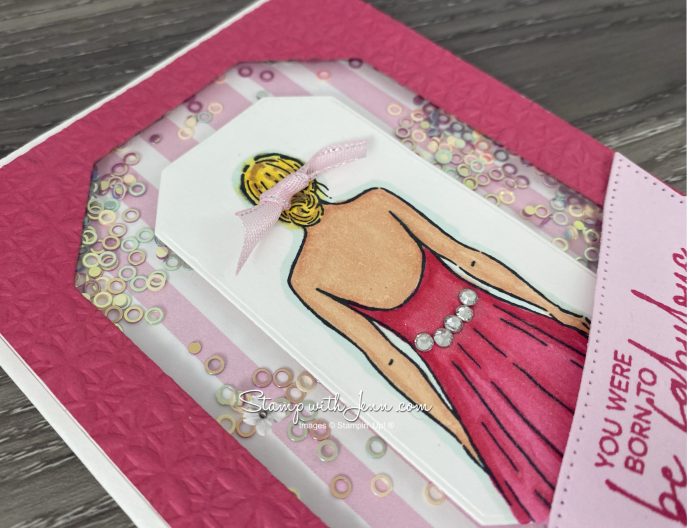 I used Melon Mambo and Bubble Bath as my two pink colours. It had to be pink for Barbie. The striped paper in the background is the Delightfully Eclectic Designer Series Paper from Stampin’ Up! I thought the striped pattern looked a little bit like the inside of a wardrobe Barbie might have

The Delightfully Eclectic Designer Series Paper has a variety of designs and styles. It’s also a HUGE package of paper. You get 48 sheets of double-sided patterned paper (4 each of 12 designs).

I coloured Barbie with these Stampin’ Blends markers (see the complete supply list at the end of this post):
- Stampin’ Blends Daffodil Delight Combo Pack (Barbie’s hair)
- Stampin’ Blends Pecan Pie Light (Barbie’s highlights in her hair)
- Stampin’ BlendsMelon Mambo Combo Pack (Barbie’s dress)
- Stampin’ BlendsLight Combo Pack (Barbie’s skin tone)
- Stampin’ BlendsPool Party Light (for an outline around Barbie)
To make the shaker part of the card, it is probably easiest to watch the video below. But here are some quick instructions on how to make a shaker card.
Shaker Card Instructions
- Die cut the opening/frame for the card (I used the Country Side Corners dies with Melon Mambo cardstock.
- If desired, stamp or emboss the die-cut frame (I used one of the Basics 3D Embossing folders).
- Apply a thin layer of Multipurpose Liquid Glue on the back of the embossed cardstock.
- Attach a Window Sheet to the glue (cut this sheet slightly smaller than the frame.). Seal the glue and the window sheet to the cardstock by running your finger around the edges.
- Build a frame using the Foam Adhesive strips on the backside, on top of the window sheet. Makes sure there are no gaps in this frame. Remove the backing on the Foam Strips.
- Add the sequins or shaker bits either to the inside of the frame or to the piece it will attach to.
- Carefully put the two pieces together and seal them.
- Shake!!
- Finish off your card!
I should also mention that the greeting is from the stamp set Friendship Royalty. I modified the “You were born to be fabulous, not perfect” by cutting off the comma and the “not perfect” (see the picture below). I did save the cut pieces of the stamp so that I could add them back in if I wanted. But I LOVE the saying “You were born to be fabulous” a lot better”(especially for Barbie)!
Watch the video for how I made the banner for the greeting.

Check back to www.stampwithjenn tomorrow where I will show my matching Ken card -not as pretty as Barbie, but it’s ‘Just Ken’ ; ).
Product List
")
")


 Designer Series Paper")
 Sheer Ribbon Combo Pack")


