Easy Card Layout That Lets Designer Series Paper Shine
Do you ever have a piece of Designer Series Paper that’s so pretty you almost don’t want to cover it up?
That’s exactly how I feel about the Floral Charm Designer Series Paper! The patterns are beautiful all on their own, so instead of adding lots of layers and complicated details, I decided to let the paper do the work.
And the best part? This is a really simple card layout that you can use again and again with different papers, colours and greetings.

Let the Pretty Paper Be the Star
For my original card, I chose one of the beautiful floral patterns from the Floral Charm Designer Series Paper and paired it with Night of Navy, Basic White and Fresh Freesia accents.
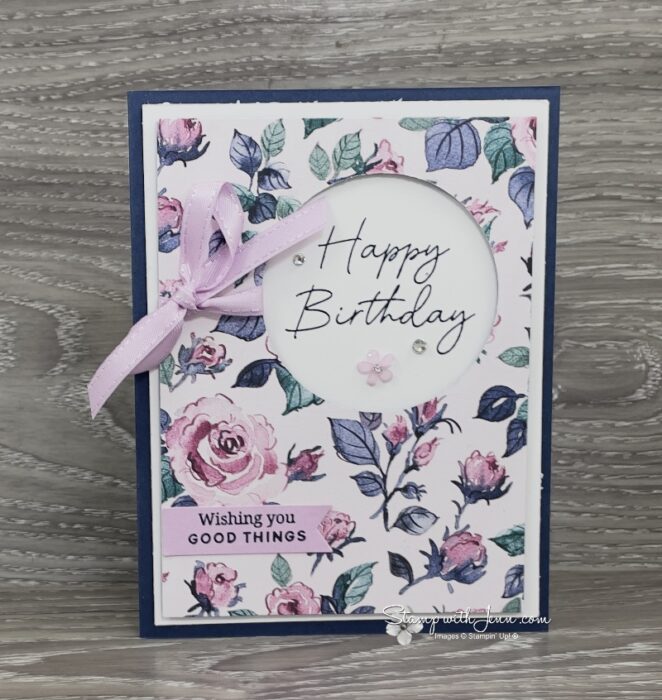
The Designer Series Paper covers most of the card front, which means you really get to enjoy the pattern instead of covering it with lots of other elements.
A simple punched circle creates a spot for the large birthday greeting, while a small banner sentiment, ribbon and a few embellishments add just enough detail.
That’s my kind of card—simple to make, but it doesn’t look boring!
An Easy Card Layering Formula
Here’s another reason I like this layout: the measurements are easy to remember.
Measurements:
- Card Base: 8 1/2″ x 5 1/2″, scored at 4 1/4″
- First Layer: 5 1/4″ x 4″
- Designer Series Paper: 5″ x 3 3/4″
- Inside Layer: 5 1/4″ x 4″
- Extra Greeting: Scrap cardstock
Each layer is simply 1/4″ smaller than the one underneath it. That gives you a nice, even border without having to do complicated measuring every time.
 Jenn Tip: Keep this layering formula handy. Once you remember 5 1/4″ x 4″ and 5″ x 3 3/4″, you can use the same basic layout with all kinds of Designer Series Paper.
Watch This Easy Designer Series Paper Card Come Together
If you’d like to see exactly how I made the card, including the punched opening, layering and finishing details, you can watch the full video below.
One of the things I especially like about this design is that you don’t need a die-cutting machine. I used the 2 3/8″ Circle Punch for the opening and the Three Banner Punch for the smaller greeting.
If you don’t have those exact punches, that’s okay too. A circle die or another punch that fits your greeting would work just as well.
Let the Designer Series Paper Choose Your Colours
Here’s one of my favourite tricks when I’m working with patterned paper:
Don’t struggle to invent a colour combination—let the Designer Series Paper choose it for you!
Look at the colours that are already in the pattern and use those as the starting point for your cardstock, ink, ribbon and embellishments.
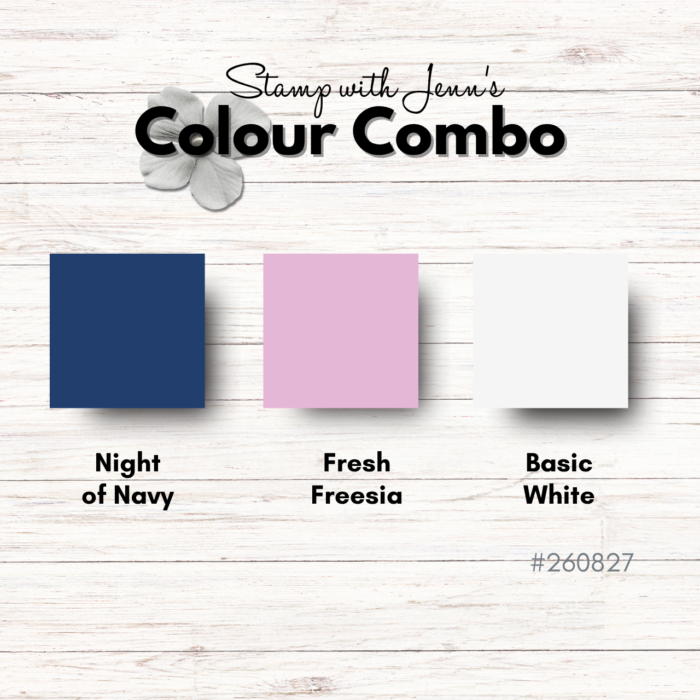
For my original card, I pulled Night of Navy, Fresh Freesia and Basic White from the Floral Charm Designer Series Paper. Once those three colours were chosen, everything else—from the cardstock and ink to the ribbon and embellishments—was easy to coordinate.
That’s exactly what I did with the other versions of this card.
A Richer Colour Combination

For this version, I pulled richer neutral and purple tones from the DSP and paired them with Blackberry Bliss and Crumb Cake.
The warmer colours give the exact same card layout a completely different feeling.
Mossy Meadow + Timid Tiger

This pretty Floral Charm pattern gave me another colour combination to play with. I picked up the Mossy Meadow and Timid Tiger colours from the DSP and used those for the rest of the card.
Same basic design. Completely different look.
That’s one of the reasons this is such a handy card layout to keep around—you can simply change the paper and let it guide the rest of your choices.
Florals Aren’t Your Only Option
Floral Charm may have “floral” in its name, but don’t overlook some of the less-floral patterns in the package.
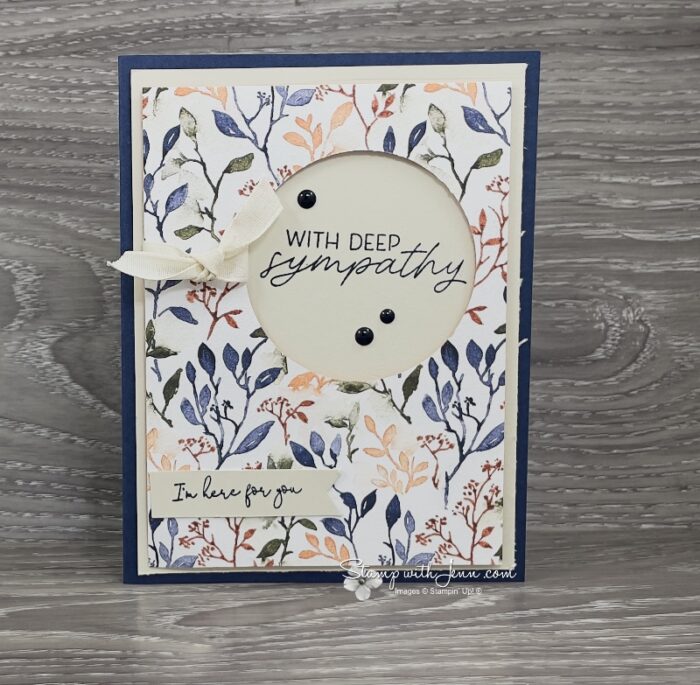
For this card, I chose a more leafy pattern and paired it with a deep blue and Basic Beige. The result feels quite different from the floral birthday cards and works beautifully when you want something a little more understated.
In fact, I recently used this version as a sympathy card for a man.
Basic Beige is also a really useful neutral. It’s deeper than Basic White or Very Vanilla, but not as dark as Crumb Cake, so it’s still light enough to stamp on easily.
Don’t Forget the Other Side of Your DSP!
Here’s something else I played with after my Friday Live—I flipped the Floral Charm Designer Series Paper over.
The reverse sides have some lovely, more muted and monochromatic patterns, giving you yet another way to use the same package of paper.

I really like this Pretty Peacock version paired with Basic Beige. The leafy design makes it another good option when you want something less floral or a little more masculine.
It’s also a good reason to look at both sides of your Designer Series Paper before you start cutting!
Jenn Tip: If one side of your DSP feels too bold for the card you have in mind, flip it over. The reverse pattern may give you exactly the quieter background you’re looking for.
One Easy Card Layout, Lots of Possibilities
That’s probably my favourite thing about this card design.
You don’t have to own exactly the same products I used to make it work. Once you understand the basic layout, you can change:
- the Designer Series Paper
- the cardstock colours
- the greeting
- the circle punch or die
- the ribbon and embellishments
- the occasion
And there’s one more small detail worth trying: pop the DSP layer up with Stampin’ Dimensionals. I tried the card both flat and raised, and I prefer the popped-up version. That little shadow around the layer gives the card some extra depth without making the design any more complicated.
So pull out some of that pretty patterned paper you’ve been saving and let it be the star of the card.
Yes—even the DSP you’ve been keeping because it’s “too pretty to cut.”
Want More Easy Card-Making Ideas?
If you enjoy card ideas that are easy to recreate but still have those little details that make them feel special, I’d love to have you join my FREE Rubber Stamping & Card Making Newsletter.
I share card-making inspiration, project ideas, tips, Stampin’ Up! news and more to help you get more from the supplies in your craft room.
Get My FREE Card Making Newsletter
Shop Floral Charm Designer Series Paper
If you’d like to create your own version, you can see the Floral Charm Designer Series Paper here:
You’ll also find the other Stampin’ Up! products I used for these cards in the complete product list below.
Product List
![Scalloped Blooms Photopolymer Stamp Set (English) [ 167639 ]](https://assets1.tamsnetwork.com/images/EC042017NF/167639s.jpg "Scalloped Blooms Photopolymer Stamp Set (English) [ 167639 ]")
![Banner Sayings Photopolymer Stamp Set (English) [ 167044 ]](https://assets1.tamsnetwork.com/images/EC042017NF/167044s.jpg "Banner Sayings Photopolymer Stamp Set (English) [ 167044 ]")
![Banner Sayings Bundle (English) [ 167051 ]](https://assets1.tamsnetwork.com/images/EC042017NF/167051s.jpg "Banner Sayings Bundle (English) [ 167051 ]")
![Night Of Navy Classic Stampin' Pad [ 147110 ]](https://assets1.tamsnetwork.com/images/EC042017NF/147110s.jpg "Night Of Navy Classic Stampin' Pad [ 147110 ]")
![Floral Charm 12" X 12" (30.5 X 30.5 Cm) Designer Series Paper [ 166125 ]](https://assets1.tamsnetwork.com/images/EC042017NF/166125s.jpg "Floral Charm 12\" X 12\" (30.5 X 30.5 Cm) Designer Series Paper [ 166125 ]")
![Night Of Navy 8-1/2" X 11" Cardstock [ 100867 ]](https://assets1.tamsnetwork.com/images/EC042017NF/100867s.jpg "Night Of Navy 8-1/2\" X 11\" Cardstock [ 100867 ]")
![Basic White 8 1/2" X 11" Cardstock [ 159276 ]](https://assets1.tamsnetwork.com/images/EC042017NF/159276s.jpg "Basic White 8 1/2\" X 11\" Cardstock [ 159276 ]")
![Three Banner Punch [ 167050 ]](https://assets1.tamsnetwork.com/images/EC042017NF/167050s.jpg "Three Banner Punch [ 167050 ]")
![2 3/8" (6 Cm) Circle Punch [ 161354 ]](https://assets1.tamsnetwork.com/images/EC042017NF/161354s.jpg "2 3/8\" (6 Cm) Circle Punch [ 161354 ]")
![Fresh Freesia 1/4" (6.4 Mm) Satin Ribbon [ 168199 ]](https://assets1.tamsnetwork.com/images/EC042017NF/168199s.jpg "Fresh Freesia 1/4\" (6.4 Mm) Satin Ribbon [ 168199 ]")
![Adhesive Backed Blooms [ 168198 ]](https://assets1.tamsnetwork.com/images/EC042017NF/168198s.jpg "Adhesive Backed Blooms [ 168198 ]")
![Rhinestone Basic Jewels [ 144220 ]](https://assets1.tamsnetwork.com/images/EC042017NF/144220s.jpg "Rhinestone Basic Jewels [ 144220 ]")
![Take Your Pick [ 144107 ]](https://assets1.tamsnetwork.com/images/EC042017NF/144107s.jpg "Take Your Pick [ 144107 ]")
![Stampin' Dimensionals [ 104430 ]](https://assets1.tamsnetwork.com/images/EC042017NF/104430s.jpg "Stampin' Dimensionals [ 104430 ]")
![Stampin' Seal [ 152813 ]](https://assets1.tamsnetwork.com/images/EC042017NF/152813s.jpg "Stampin' Seal [ 152813 ]")