
nbsp;
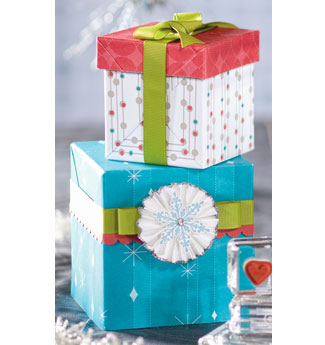
Basic Gift Wrap
-
Wrap small presents using Holiday Lounge Designer Series paper.
-
Embellish with strips of coordinating card stock, scalloped using Scallop Edge punch.
-
Tie ribbons around presents using the bow techniques from the July 2008 issue of Stampin’ Success (a free demonstrator magazine).

-
Punch four circles from Whisper White card stock using 1-3/4″ Circle punch. Set one circle aside.
-
Score across each of the three remaining circles using bone folder and ruler, creating a starburst pattern.
-
Pierce hole in center of starburst using paper-piercing tool.
-
Cut slit along one score line to pierced hole. Fold each circle in accordion along score lines to create fans.
-
Apply Tombow Multi Purpose adhesive to outside (curved) edge of fans, and apply Silver glitter to edge. Allow glitter to dry thoroughly before continuing.
-
Take one fan, and adhere one end section to the end section of a second fan, overlapping two folded sections (a “v” shape) to ensure that the pieces are securely fastened together. The unfastened ends of your two circles will overlap, creating a spiral.
-
Adhere one end of final fan to unfastened end at top of spiral, overlapping two folded sections to ensure that pieces are securely fastened together.
-
Arrange spiral so that it lays flat to create a ruffled, two-layer circle. You may have to trim off a section of the ruffle if the direction of the folds will not allow the ruffle to lay flat.
-
Apply Tombow Multi Purpose adhesive across surface of remaining Whisper White circle, and adhere ruffle to circle.
-
To finish embellishment, stamp snowflake image in Taken with Teal ink on Whisper White card stock, and cut out. Attach Clear Rhinestone brad center of snowflake. Adhere snowflake to center of ruffle using two layered Stampin’ Dimensionals.
-
Adhere embellishment over top of tailored bow using two layered Stampin’ Dimensionals.


Stamps:
- Snowman Mini Card Tag created by Sofi Daniels
- Dasher Tag created by Wendy Fee
-
Stamp Snowman in basic black ink on a scrap of white cardstock.
-
Colour snowman using markers.
-
Punch out snowman image using largest circle punch.
-
Cut tag base 3 x 3 inches.
-
Punch various sized circles from old olive and real red cardstock.
-
Attach circles randomly to the front of the tag making sure to hang some of the edges off the card and then trim with scissors.
-
Attach snowman circle to the front of the tag using dimensionals.
1. Sponge old olive ink onto the whisper white card stock. Use some circular motion and some pouncing. Basically you don’t want an even colouring.
2. Then sponge chocolate chip around the edges.
3. Stamp Dasher in chocolate chip.
4. Stamp “for you” with versamark ink at the bottom of the Chocolate Chip piece of card stock. Liberally sprinkle white emboss powder and shake off excess. Heat with the heat tool until glossy.
6. Using the paper snips, cut off one corner of the chocolate chip piece of card stock. Use the cut-off piece as your pattern to cut the other corner.
7. Punch a hole and set the jumbo eyelet in the centre. Thread chocolate chip grosgrain ribbon through and tie it.
8. Adhere the dasher panel to the chocolate chip tag.
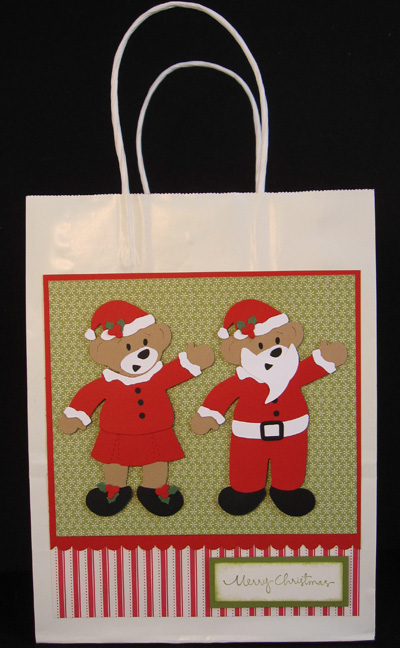
1. Cut the cardstock and Designer Series Paper as follows:
-
7″ x 6″ piece of Merry Moments DSP; Old Olive Snowflake pattern
-
7 1/4″ x 2″ piece of Merry Moments DSP; Real Red Stripe pattern. Note, this needs to be cut on a 45 degree angle to get straight stripes.
-
7 3/4″ x 7 1/4″ piece of Real Red cardstock
-
3″ x 1″ piece of Very Vanilla cardstock
-
3 1/4″ x 1 1/4″ piece of Old Olive cardstock
2. Punch along one of the 7 1/4″ sides of the Real Red cardstock using the Scallop Edge punch.
3. Adhere striped DSP, Real Red cardstock, and Old Olive DSP to the bag.
4. Stamp greeting on Very Vanilla cardstock using Old Olive ink, and sponge edges. Adhere to Old Olive cardstock. Adhere to bag using Stampin’ Dimensionals.
5. Using the Big Shot, die cut the following pieces:
-
Creamy Caramel – 2 bears (Bear Die)
-
Basic Black – 2 sets of shoes, 1 belt buckle (Beary Merry Die)
-
Whisper White – 1 belt, 1 beard, 2 shirts, 2 hats (Beary Merry Die); 2 muzzles (Bear Die)
-
Old Olive – 4 sets of holly leaves (Beary Merry Die)
-
Real Red – 2 shirts, 2 hats, 4 berries, 1 pants (Beary Merry Die); 1 skirt (Beary Essentials Die)
7. Glue the pieces onto the bears in the following order: Muzzle, shoes, bottom (skirt & pants), shirt, hat, belt, buckle, beard, holly leaves, & berries.
8. Adhere bears to bag using Stampin’ Dimensionals.

Christmas (p. 40), Holiday Lineup (p.43), Season of Joy (p. 32), Best Wishes and More (p. 64), Serene Snowflakes (Holiday Mini Catalogue)
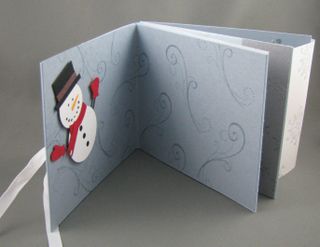
Step By Step Instructions:
-
Cover is one piece of white cardstock 12 x 4 1/4″. Do not fold until assembling. You need to leave approximately 1 1/4″ on right side to close cover (overlap).
-
1st Layer of Book is 3 pieces of Bashful blue 11 x 4 1/4″ (fold in half).
-
2nd layer of Book is 2 pieces bordering blue 10 x 4 1/4″ (fold in half) & 1 piece of Card Stock Vellum 10 x 4 1/4″ (fold in half).
-
Decorate cover as shown on the white cardstock PRIOR TO ASSEMBLING. Stamp the snowflakes and the Snow stamp and colour and mount on matching cardstock. Silver snowflake is silver embossed on a piece of silver cardstock and cut out.
-
For the first fold out page stamp a
10 x 4 1/4″ bordering blue piece of cardstock with swirls. Decorate with punched out snowman. -
When ready to assemble, start with 3 pieces of bashful blue 11 x 4 1/4″ folded in half, adhere tape on open ends of right side approximately 1″ only of piece 1 and adhere to left side of piece 2. Then tape end of right side approximately 1″ of piece 2 to left side of piece 3. So your 3 pieces now become 1 in three sections. From the top view this looks like 3 “V’s” taped together on the top edges.
-
Take 1st piece of bordering blue 10x 4 1/4″ (folded in half) and tape back of left side and back of right side down a strip and adhere to bashful blue (again about 1″ only) 1st page above. Take your vellum 10x 4 1/4″ (folded in half) and adhere to 2nd section of book (middle of book) same as you did above. And take 3rd section (bordering blue ) folded in half 10x 4 1/4″. From the top view this now looks like each of your “V’s” have floating mats on them.

-
To place cover on the Book. YOU DO NOT WANT TO TAPE THE ENTIRE COVER ( you want it to be flexible this is what gives the star appeal!!!). Only tape again approximately 1″ on back of bashful blue and place on cover front, tape back of 3rd section of bordering blue and layer into the cover to adhere. Just wrap the white cardstock around. Once the main book is covered, fold that extra piece on right side and fold over to form flap to open and close book.
-
Adhere tape & Ribbon under Big on Christmas design on front cover to tie star book closed. This project is much easier to see and do in person. If you would like to take a class on this, let me know fun@stampwithjenn.com and I’ll set one up in the New Year. You could adapt this to a nice Father’s Day or Mother’s Day Gift!
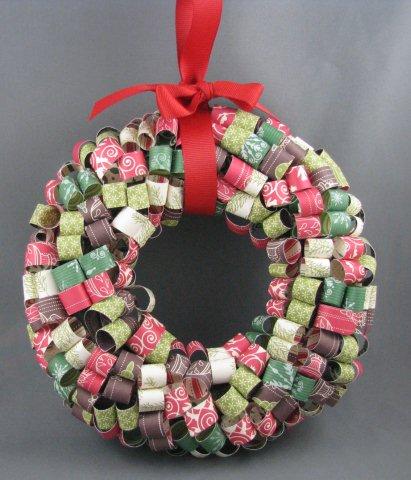
Week 8 – Wreath Decoration


 Ingredients:
- Merry Moments Designer Series Paper
- 5/8 Real Red grosgrain ribbon
- 6 inch Foam Wreath
- Dress Maker Pins
Step By Step Instructions:
1. Cut strips of DSP 1/2″x4″. Use approximately 3-4 sheets total.
2. Use the bone folder to curl the edges slightly, finishing them by hand.
3. Use dressmaker pins to adhere the paper to the foam.
Pins small heads that aren’t too long are the best (approximately #17 size pins). To save your fingers, you could use a thimble to help push them in or the end of your paper piercer would work too!
Tips: There are about 5 “curls” deep on the wreath. You can line them up all in a row as shown, but add a few going the opposite way near the centre for depth! The picture below shows the back of the wreath. You want to leave the back empty so it can lay flat against a door. There is no WRONG way to do this…just cover up the wreath and it will look pretty!

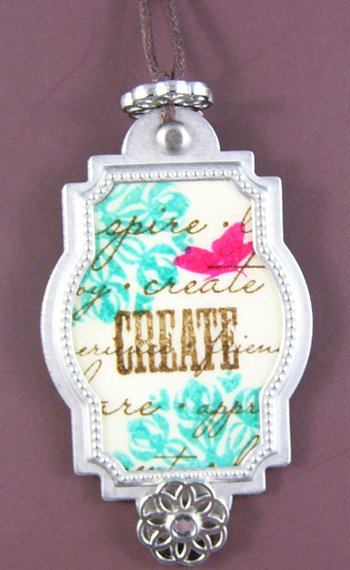
Step by Step Instructions
1. Take piece of Very Vanilla cardstock and stamp script image from Charming Stamp Set in Soft Suede.
2. Punch out centre of stamped image with Designer Label punch. Punch out another blank Designer Label punch out of Very Vanilla and put aside.
3. Stamp medallion image in Bermuda Bay in top left and bottom right of panel.
4. Stamp butterfly in Melon Mambo.
5. Cover both pieces of Very Vanilla with Versamark, and then with Glassy Glaze Enamel. Set with heat tool until glaze is fully melted. Cover both pieces again with Versamark and Glassy Glaze and heat.
6. Once both pieces are cooled, stick them together using Stampin’ Dimensionals (4). Then sandwich these pieces between two of the Designer Label hardware pieces.
7. On the bottom, take a filigree brad and then put a clear rhinestone brad through this and then through both pieces of hardware. Butterfly the back so the two pieces of hardware are sitting snugly. Cut off any excess off the brad in the back with pliers.
8. On the top, loop the cord through the two holes of the hardware, and then put silver brad through the hole on both layer two.
9. Take the filigree brad and thread cord through both ends, and then tie in a knot to hold in place.
10. The fi
nished necklace can either be tied on to wear, or a clasp added to the hemp cord.

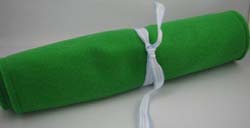
Week 6 – Build-a-Bear Felt Board 
Ingredients:
- Big Shot
- Stampin’ Up! Bear Bigz Die
- Stampin’ U! Beary Essentials Bigz Die
- Stampin’ Up! Kooky Spooky Bigz Die
- Scallop Circle #1 Die
- 1/2″ Bashful Blue Striped Grosgrain Ribbon
- 2 Way Glue
- Dazzling Diamonds Glitter
Other Ingredients:
-
Felt (colours: sky blue,brown, light green, dark green, carmel, denim blue, orange, black, white, light pink, dark pink and purple)
-
Scissors
-
Sewing Machine


Instructions:
1. Cut a piece of blue felt and a piece of green felt 18 x 12 “.
2. Cut 2 hills from a piece of 6 x 12” piece and a 4 x 10” of felt.
3. Cut a piece of ribbon 20” long.
4. Layer and pin the felt together…green back + blue front+ 2 hills (they will overlap). Place the ribbon (folded in half) in between the front and back layer approximately with one inch tucked inside.
5. Sew on the machine with green thread around the entire frame of the mat…making sure to sew the ribbon in (as pictured).
6. Cut pieces using the Big Shot and the dies.
7. Hand cut the tree trunk.
8. Use 2 way glue pen and glitter to add sparkle to one of the shirts.
9. Tuck all the pieces in the pocket and roll it up!
10. All you need to add is a tag to this gift!
Week 5 – Reindeer at Midnight
Stamp Sets: Scenic Season (pg.35), Winter Post (p.35), Teeny Tiny Wishes (p.145)
Cardstock: Old Olive, Basic Black, Glossy
Inks: Basic Black Classic, Old Olive Classic, Brocade Blue Classic
Accessories: Basic Black Marker, 3/4″ Circle Punch, Brayer, Stamp-a-ma-jig
Other: Post it Note, Scrap Paper
Instructions:
- Fold 4-1/4″ x 8-1/2″ Old Olive cardstock in half.
- Attach 4″ x 4″ piece of Basic Black cardstock to front of card.
- Ink up Trees in Old Olive ink and stamp on a piece of scrap paper (make sure the paper is wider than 4″ and taller than 3″).
- Cut out the stamped image on the “snow” line. This is your mask.
- Ink up the Trees in Old Olive ink and with your finger (or a baby wipe), dab the ink off the bird.
- Ink the bird up with the Basic Black marker
- Stamp the Tree image midway on the Glossy cardstock (Glossy is 3-3/4″ x 3-3/4″)
- Let the Tree image dry.
- Punch out a post it note circle with the Circle Punch and lay it on the Glossy cardstock overlapping the bird.
- Lay the mask along the snow line to keep the “snow” white. Use the Brayer to layer on Brocade Blue ink. With the Brayer, start at the top edge and move down so that near the snow line is a lighter colour.
- Ink up the Reindeer stamp in Basic Black ink and stamp in front of Trees.
- Use the Stamp-a-ma-jig to stamp the saying in Brocade Blue ink.
Week 4 – “To All a Good Night” 
Stamp Sets: Wandering Words (pg. 16 Holiday Mini); Lovely as a Tree (p. 110)
Cardstock: Night of Navy, Whisper White, Glossy
Inks: Basic Black Classic, Night of Navy Classic, Brocade Blue Classic
Accessories: 1 ¾ inch Circle Punch, White Gel Pen, 2 way glue pen, dazzling diamonds glitter, brayer, sponges
Other: Post it Note
Instructions:
1. Fold 5 ½ “ x 8 ½ “ white cardstock in half.
2. Attach 5 ¼“ x 4” piece of Night of Navy cardstock to front of card.
3. Ink up Trees in Black ink and stamp along bottom of Glossy cardstock (Glossy is 5” x 3¾”).
4. Ink Up Santa’s Sleigh stamp in Black ink and stamp along top of card on an angle.
5. Punch out a post it note circle with circle punch and lay it on glossy cardstock overlapping the sleigh.
6. After black ink is dry, use the brayer to layer on Brocade blue Ink.
7. Use a sponge with Night of Navy ink to add some darker highlights to row of trees and top of card.
8. Remove post it note and let dry for a few minutes.
9. Use white gel pen to add highlights/snow to trees.
10.
Week 3 – Sparkly Reindeer Christmas Card
Stamp Sets: Sparkly & Bright (p. 41) 
Cardstock: Close to Cocoa, Real Red, Whisper White
Inks: Close to Cocoa Classic Ink, Real Red Classic Ink, Whisper White Craft ink
Accessories: Real Red Marker, Scallop Circle Punch, 1 3/8 inch circle punch, scallop edge Punch, 5/8” Real Red Grosgrain Ribbon, 2 way glue pen, dazzling diamonds glitter, paper piercing tool, dimensionals, paper snips.
Instructions:
1. Ink up reindeer stamp in close to cocoa ink & then use the red marker to ink up his nose! Stamp on a piece of scrap white cardstock.
2. Use the large circle punch (upside down so you can see) and punch out the reindeer.
3. Punch out a scallop red circle and tape the reindeer on top.
4. Use the paper piercing tool to poke holes in each of the scallops.
5. Fold Cocoa cardstock in half for the base of the card.
6. With white craft ink, stamp the snowflakes on the front of the card.
7. Scallop both edges of a piece of red cardstock that is 2 ½” by 4 ¼”.
8. Wipe the white inkpad against the edges of a strip of close to cocoa that is 1 ¾” by 4 ¼”. Tape to red scalloped piece.
9. Tie red ribbon around band and notch ends of ribbon.
10. Attach band to front of card.
11. Use dimensionals to attach the reindeer image to front of card.
12. Stamp saying in red ink on white cardstock 2” by ¾”.
13. Mount on red cardstock 2 ¼’ by 1”.
14. Tape saying to front of card.
15. Use 2 way glue pen on reindeer’s nose, centres of each snowflake and the words “sparkly and bright” and then sprinkle with dazzling diamonds glitter.
 Week 2 – Santa Snowflake Card

- Cut 4 1/4 by 8 1/2 panel of Soft Suede. Fold in half using bone folder.
- Stamp sleigh image from Wandering Words on 1-3/8″ by 4-5/8″ piece of Whisper White cardstock in Soft Suede.
- Take a small amount of shimmer paint and put on a baggie. Put a drop of each reinker into shimmer paint and mix with a toothpick.
- Using the Sponge Dauber, gently sponge onto the edge of the stamped image.
- Adhere this panel to 4-3/4″ by 1-3/4″ piece of Real Red, and then adhere onto a 2″ by 4-7/8″ panel of Soft Suede.
- Take a 3-1/4″ x 5-1/8″ piece of Shimmery White cardstock and run Eyelet Border punch along one of the long edges. Adhere stamped panel using SNAIL to this panel.
- Take piece of Soft Suede ribbon and attach using SNAIL to back edges of panel as pictured above.
- Punch a snowflake out of Shimmery White cardstock using Snowflake punch. Attach to panel with rhinestone brad.
- Take two way glue pen and apply to edges of snowflake and then cover with Dazzling Diamonds. Tap off excess.
- Adhere 2-3/4″ by piece of Christmas Cocoa designer series paper along left edge of card base.
- Attach main panel using SNAIL to card base.

Week 1 – Penguin Snowglobe Card
Inks:

-
Fold red card base in half.
-
Stamp penguin with Basic Black ink in the middle of a 2 1/4″ x 2 1/4″ square of Whisper White cardstock.
-
Color in penguin with markers.
-
Stamp 5 1/4″ x 2.5″ Tempting Turquoise cardstock repeatedly with snowflake stamp in Tempting Turquoise ink and Basic Black ink.
-
Use white polka-dot DSP 5 1/4″ x 2 1/4″ and color in some of the dots with markers.
-
Layer the polka dot DSP onto the Tempting Turquoise cardstock.
-
Tape ribbon to middle of card and attach to card base.
-
Attach the 3 3/4″ x 2 3/4″ Real Red cardstock to the middle of the card.
-
Ink up “Merry Christmas” with a marker and stamp on bottom of 3.5″ x 2.5″ piece of Whisper White cardstock.
-
Use circle punch to punch a hole at the top of the Whisper White cardstock.
-
Carefully put about 1/2 teaspoon of snow into the treat cup and 1/8 teaspoon of Chunky Sprinkles Glitter.
-
Remove the protective paper on the cup’s edge and lay the penguin square, centered, on top to seal.
-
Use repositionable tape (or lightly tack) the snowglobed penguin on the red mat.
-
Check out your alignment by laying the punched out, stamped white layer on top and move penguin layer as necessary to center it all.
-
When perfect position is reached, remove punched out layer and generously apply adhesive and then attach.
-
Shake up some fun!!