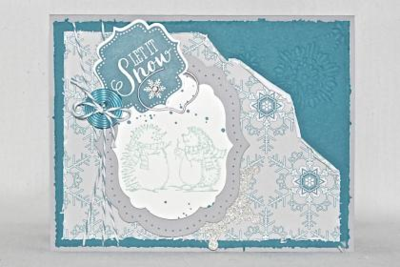
With the official arrival of winter and the Holiday’s, we often find our thoughts turning to the idea of fluffy white snowflakes falling from the sky regardless of where we live. This card commemorates the arrival of snow. It features the “Let it Snow” and “Hedgehog” stamps from the Stampin’ Up! Best of Snow Stamp Set.
SUPPLIES
STAMPS:
Ink: (126986) Island Indigo, (126982) Pool Party, (100730) Whisper White
Card stock: (122923) Island Indigo, (131202) Smoky Slate
Designer Series Paper: (132341) Winter Frost Specialty Designer Series Paper, (124005) Silver Glimmer Paper
ACCESSORIES: (125575) Island Indigo Baker’s Twine, (130028) Designer Buttons – Brights, (129389) Hung Up Cute Clips, (119246) Rhinestone Basic Jewels
Tools: (113439) Big Shot, (125598) Labels Collection Framelits Dies, (132193) Festive Flurry Framelits Dies, (120902) Northern Flurry Embossing Folder, (127857) Festive Paper-Piercing Pack, (126189) Paper-Piercing Tool, (127562) Stampin’ Distress Tool, (126199) Stampin’ Pierce Mat, (132153) Label Bracket Punch, (126889) Stampin’ Trimmer, (104430) Stampin’ Dimensionals, (104332) SNAIL Adhesive, (103683) Mini Glue Dots
Stamp Sets: (c: 134387) Best of Snow, (w: 130514; c: 130517) Gorgeous Grunge
INSTRUCTIONS
- Cut card base using Smoky Slate card stock to 5 1/2” x 4 1/4”.
- Cut Island Indigo card stock layer to 5 3/8” x 4 1/8” and distress the edges using the Stampin’ Distress Tool.
- Cut Winter Frost Specialty Designer Series Paper to 5” x 3 3/4” then while holding the cut Winter Frost Specialty Designer Series Paper in a horizontal position tear off the right-hand corner starting from the top middle down towards the right edge and curl the torn edge.
- Distress the remaining edges of the Winter Frost Specialty Designer Series Paper using the Stampin’ Distress Tool.
- Line up the Winter Frost Specialty Designer Series paper against the Island Indigo distressed layer to determine how you want the snowflakes from the Northern Frost Embossing Folder to appear then emboss the Island Indigo layer with the Northern Frost Embossing Folder.
- Attach the Winter Frost Specialty Designer Series Paper to the Island Indigo layer using the SNAIL Adhesive.
- With the card front in a horizontal position, take the Island Indigo Baker’s Twine and wrap it around the card 3 or 4 times in a criss-cross pattern on the left side and tie it with a knot towards the upper left corner of your layered paper. Do NOT attach the button yet.
- Cut a small snowflake out of the Silver Glimmer Paper using the Festive Flurry Framelits Die.
- Stamp the Hedgehog from the Best of Snow Stamp Set using the Pool Party Classic Ink on Whisper White card stock.
- Stamp the “dot” pattern from the Gorgeous Grunge stamp set using the Island Indigo Classic Ink in a circular pattern around the stamped Hedgehog.
- Cut out the stamped Hedgehog using the second smallest sized Labels Collection Framelits Die.
- Cut out the Labels Collection Framelits Die Shape from Smoky Slate using the third smallest sized die then use the Festive Paper-Piercing Pack with the paper-piercing tool to paper pierce the Smoky Slate labels cut out.
- Attach the Hedgehog layer to the Smoky Gray Labels cutout using the Stampin’ Dimensionals.
- Using Island Indigo Classic Ink, stamp the “Let it Snow” image from the Best of Snow stamp set.
- Punch out the stamped “Let it Snow” image using the Label Bracket Punch.
Attach the “Let it Snow” punched image to the Hedgehog using the Hung Up “bubble” shape then add a Stampin’ Dimensional (or two) to hold it in place. You may need to double stack the Stampin’ Dimensional when you attach it to the card. - Place the Hedgehog / Let It Snow layers on the card front but do not attach yet, place Hedgehog layers so it overlaps some of the Island Indigo Baker’s Twine then tuck the Silver Glimmer star under the Hedgehog and attach the silver star to the background.
Attach the Hedgehog layer to the background using the Stampin’ Dimensionals. - Thread the Island Indigo Baker’s Twine through the Island Indigo Designer Button and tie a bow. Place the button where desired and attach using mini glue dots.
- Attach the card front to the Smoky Slate card base using either the SNAIL Adhesive or the Stampin’ Dimensionals (in the photo, Stampin’ Dimensionals were used to attach the card front to the card base).
- Add a little more bling by placing a Rhinestone Jewel centered on the little snowflake of the “Let It Snow” stamped image.
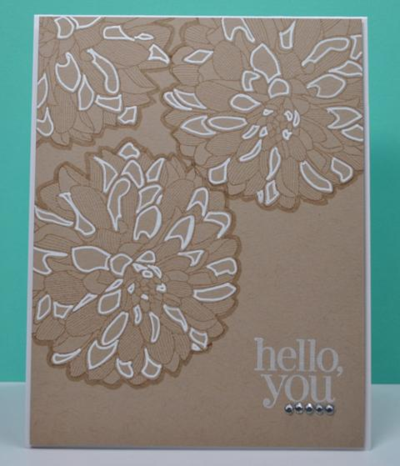
Some of us have the best of intentions to get Christmas or Holiday cards out each year, although it never happens. But all is not lost! Just because we might have missed the boat on getting Holiday cards out, we still have the opportunity to reach out to our friends and family in the NEW YEAR! Creating a wonderfully simple HELLO themed card would be great to send out and update your friends and family about you and your own family.
SUPPLIES
STAMPS: Regarding Dahlias (130327- C, 130324-W)
INK: Crumb Cake (126975), Crushed Curry (131173), Uniball Gel Pen (105021)
CARD STOCK: Whisper White (100730), Crumb Cake Card Stock (120953)
ACCESSORIES: Crumb Cake Marker (120967)Basic Rhinestones (119246)
INSTRUCTIONS
- Cut the Whisper White card stock to 11″x 4-1/4″ and score at 5-1/2″.
- Cut a piece of Crumb Cake card stock to 4-1/8″ x 5-5/8″.
- Use the large flower image and Crumb Cake ink and stamp your floral image over the top left corner of the Crumb Cake layer.
- Use the Crumb Cake marker, and outline the floral images to create a shadow. The image will JUMP off the card stock without adding layers to the card.
- Using the uniball gel pen, outline a few of the inside petals of the floral images. This is completely optional- the card without this step would still be pretty but this helps to add some definition to the images without adding girth to the card.
- Use the Crumb Cake ink to stamp your sentiment to the lower right corner of the crumb cake layer.
- Cut off a few small rhinestones and adhere them in a line just under the YOU in the sentiment, this just adds a bit of BLING or flair to this simple and basic card.
- Use dimensionals to the back of the crumb cake layer and adhere to the card base, leaving an 1/8″ of an inch border around the edge.
 Technique: Simple Stamping using Negative Space
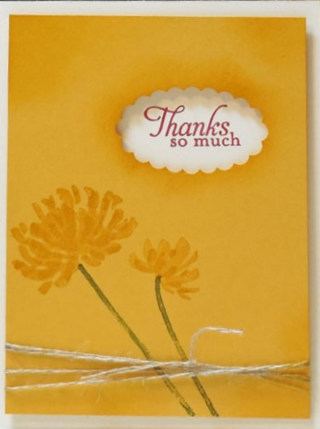
Are you looking for an easy stamping technique that makes your card look different from the ordinary? Stamp in the negative space left by punching card stock! Here’s a card showing how it’s done.
SUPPLIES
STAMPS: Simply Sketched Wood (129669-W, 129672- C), Too Kind ( 130447-W, 130450-C)
INK: Cherry Cobbler (126966), Crushed Curry (131173), Always Artichoke (126972)
CARD STOCK: Very Vanilla (101650), Crushed Curry (131199)
ACCESSORIES: Scallop Oval Punch (119856), Stamp-A-Ma-Jig (101049), Stamping Sponges (101610), Linen Thread (104199), Stampin’ Dimensionals (104430)
OTHER: Scotch tape
INSTRUCTIONS
- Cut 5-1/2” x 8-1/2” from Very Vanilla card stock. Score at 4-1/4”, but do not fold on the score line yet. This is the card base.
- Cut 3-7/8” x 5-1/3” from Crushed curry card stock. Punch a scallop circle near the upper right corner.
- Center the Crushed Curry card stock on the card front. Using the Stamp-A-Ma-Jig, stamp the sentiment in Cherry Cobbler ink on the vanilla layer, so that it shows through the punched hole. Fold the card stock on the scored line.
- Stamp the flowers on the Crushed Curry card stock, using Always Artichoke for the stems and Crushed Curry for the flowers. Sponge around the punched hole with Crushed Curry ink. I also sponged a little in the 4 corners.
- Cut a 35” strand of Linen Thread. Wind it around the card stock and tie in a knot on the front. Secure on the back with regular tape to keep the strands in position.
- Attach the Crushed Curry card stock to the card front with Stampin’ Dimensionals. I used one in each of the 4 corners, as well as one above and one below the punched hole.
Stamp the flowers on the inside of the card for that extra special touch! - A variation of this card is to stamp the flowers in the hole and the sentiment on the top card stock. Either way, this card looks a little extra special!
 WINTER FROST VERY MERRY CHRISTMAS PAGE
Beautiful patterned paper (with foil accents), a bit of sparkle and shine, and lots of fun details make this page very merry indeed.
SUPPLIES
STAMPS: Sweet Essentials (W-132085, C-126457)
INK: Bermuda Bay (131171), Silver Metallic Encore Pad (132142)
CARD STOCK: Pool Party (122924), Bermuda Bay (131197), In Color 12” x 12” Cardstock Assortment (131195)
ACCESSORIES: Winter Frost Specialty Designer Series Paper (132341), Silver Glimmer Paper (124005), Big Shot (113439), Large Scallop Edgelit Die (127019), Needlepoint Border Embossing Folder (129383), Expressions Thinlits Dies (132171), Essentials Paper-Piercing Pack (126187), Stampin’ Pierce Mat (126199), Paper-Piercing Tool (126189), Mosaic Punch (131297), Glue Dots (103683), Tea Lace Paper Doilies (129399), Whisper White Baker’s Twine (124262), Subtles Designer Buttons (130030), Brights Candy Dots (130931), Frosted Finishes Embellishments (132150)
INSTRUCTIONS
- Die-cut a (12” x 1-1/2”) strip of Coastal Cabana cardstock along the bottom edge using the Large Scallop Edgelit. (Save the scrap from the scallop edge!)
- Paper-pierce along the scallop edge using the template from the Essentials Paper-Piercing Pack.
- Adhere scallop strip over a (12” x 1-3/4”) strip of the foil specialty paper. Adhere the saved scallop scrap behind the top edge of the foil specialty paper.
- Apply Silver Metallic ink to a paper doily by pressing the pad directly onto the doily. Allow to dry or heat set with Heat Tool.
- Adhere doily behind foil/scallop strip. Adhere entire piece to the snowflake pattern Designer Series Paper, lining up the top of the piece 6” from the top of the Designer Series Paper.
- Using the Mosaic Punch, crop 18 shapes from Bermuda Bay cardstock, and 8 shapes from Pool Party patterned paper. Create two vertical rows, side-by-side, of the Bermuda Bay shapes. Place the Pool Party shapes in a vertical row down the center of the combined Bermuda Bay shapes. (Tip: Adhere the shapes to a strip of paper about ¾” wide to ease assembly.) Adhere layered Mosaic shapes to right side of page.
- Trim a piece of Bermuda Bay cardstock to 4-1/4” x 6”. Emboss one edge using the scallop embossing folder. Adhere photo to cardstock. Adhere matted photo to page using Stampin’ Dimensionals.
- Die-cut “Merry” from Silver Glimmer Paper using the Expressions Thinlits Die. Adhere to page to the left of photo.
- Tie Whisper White Baker’s Twine through a Pool Party button. Adhere button to doily using a Glue Dot.
- Cut two strips from Pool Party cardstock (3-3/4” x 1” and 4-1/2” x 1”). Stamp the shorter strip with “christmas cheer” using Bermuda Bay ink. Flag one end, adhere to lower right corner of page, and add two Bermuda Bay Candy Dots.
- On remaining Pool Party strip, adhere one Frosted Finishes Embellishment to one end and flag the other end. Add journaling as desired. Adhere to upper left corner of page.
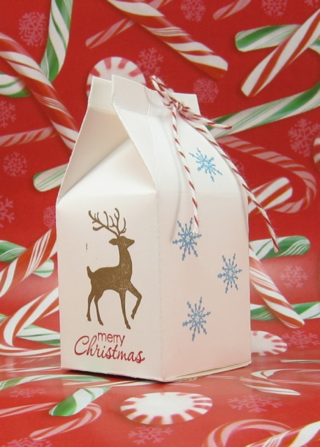
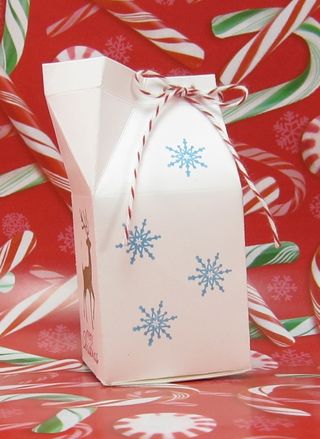
This time of year you can find several varieties of M&Ms in holiday colors and different flavors. Fill a fun little treat container with them to make a great hostess gift. or stocking stuffer. Keep several on hand for unexpected guests stopping by.
 SUPPLIES
STAMPS: Warmth & Wonder Hostess set (W- 131880, C-131883), Petite Pairs (W-128706, C- 122497)
INK: Soft Suede (126978), Real Red (126949), Marina Mist (126962)
CARD STOCK: Whisper White (100730)
ACCESSORIES: Cherry Cobbler Baker’s Twine (123125), Multipurpose Liquid Glue (110755 ), Paper-Piercing Tool (126189), Big Shot Die-Cutting Machine (113439), Mini Milk Carton Bigz Die (117310)
INSTRUCTIONS
- Die cut Mini Milk Carton from Whisper White CS using the Big Shot and Mini Milk Carton Die.
- Stamp images as shown.
- Fold on all score lines and assemble using Multipurpose Liquid Glue to secure.
- Fill with any holiday variety of candy such as M&Ms.
- Hold top closed and pierce 2 holes through all thicknesses on the back half of the top edge. (The part that will not open to pour out candy.)
- Cut a length of Baker’s Twine and thread through holes. Tie to secure.
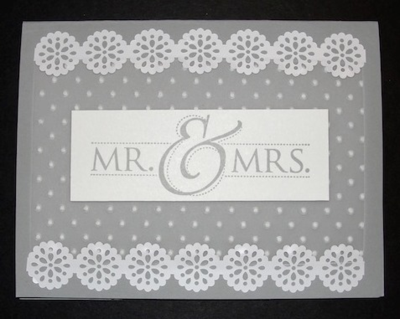
I love techniques that are simple to do and require very little work, yet add a WOW
factor to my project. Embossing vellum – is just such a technique.
SUPPLIES
STAMPS: Mr & Mrs (132575)
INK: Smoky Slate (131179)
CARDSTOCK: Smoky Slate (131202), Whisper White (100730), White Vellum (101856)
ACCESSORIES: Big Shot (113439), Perfect Polka Dots Embossing Folder (117335), Delicate
Details Lace Tape (130966)
INSTRUCTIONS
- Cut Smoky Slate card stock to 8 1/2” x 5 1/2”. Score and fold to make card base.
- Using Smoky Slate ink, stamp the image onto a Whisper White card stock piece measuring 3 3/4” x 1 1/2”.
- Use the Big Shot and Perfect Polka Dots Embossing folder to add texture to a piece of card stock vellum measuring 5” x 3”.
- Assemble card: Attach the embossed vellum to the card front using the Delicate Details Lace Tape on the top and bottom edges of the vellum. Attach sentiment to the center of the card front.
- Stamp inside of card and envelope if desired.
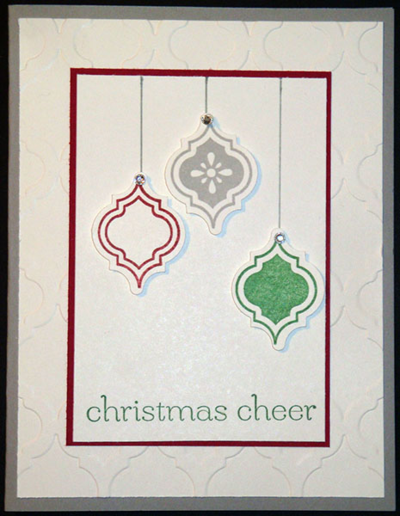
Punches are one of my favorite tools; they make creating cards so much easier! This Christmas card came together quickly and the “mosaic punch ornaments” are the focal point.
SUPPLIES
STAMPS: Mosaic Madness (w-130246, c-130249), Sweet Essentials (w-132085, c-126457)
INK: Cherry Cobbler (126966), Smoky Slate (131179), Gumball Green (126861)
CARDSTOCK: Whisper White (100730), Cherry Cobbler (119685)
ACCESSORIES: Big Shot Die-Cutting Machine (113439), Modern Mosaic Embossing Folder (129984), Mosaic Punch (131267), Rhinestone Basic Jewels (119246), Stampin Dimensionals (104430), Smoky Slate Stampin’ Write Marker (131898)
OTHER: ruler
INSTRUCTIONS
- Cut all cardstock:
Smoky Slate: 8-1/2″ x 5-1/2″, fold in half – this is your card base
Whisper White : 4″ x 5-1/4″, 3-7/8″ x 5-1/8″
Cherry Cobbler: 3-3/4″ x 4″ - Using Mosaic Embossing Folder, run largest Whisper White cardstock piece through Big Shot and adhere to Smoky Slate card base.
- Layer CC cardstock piece onto #2 Whisper White cardstock piece.
- Using a scrap piece of Whisper White cardstock stamp mosaic ornaments (see photo):
one Cherry Cobbler, one Smoky Slate, one Gumball Green - Punch out
- Place punched pieces onto card front as desired. BEFORE adhering, use journaling tip of Smoky Slate Marker and ruler to draw lines to represent ornament “hangers”
- Using one Stampin Dimensional per ornament, place onto card front, barely covering end of ornament hanger “line”
- Place one small rhinestone on top of each ornament.
- Using Gumball Green Ink and “christmas cheer” sentiment, stamp onto bottom of card front.
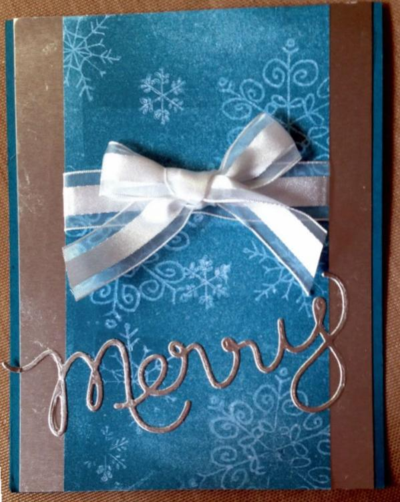
This technique is called Ghosting and I love using it with images, such as snowflakes, bold images or shadow like images.
SUPPLIES
STAMPS: Endless Wishes Stamp (133455)
INK: VersaMark (102283), Island Indigo (126986)
CARDSTOCK: Whisper White (100730 ), Island Indigo (122923)
ACCESSORIES: Brayer (102395), Silver Foil Sheets (132178), 5/8” Organza ribbon (114319),
Big Shot (113439), Expressions Thinlets Dies (132171)
INSTRUCTIONS
- Ink the stamp with VersaMark and stamp it on the Whisper White card stock. Do not apply embossing powder or heat.
- Ink the brayer with the Island Indigo ink and roll it over the whisper white CS.
- The VersaMark ink acts as a resist, and the images will appear as more color is applied.
- In the card shown, I cut the Whisper white card stock 5 1/2” X 3” and stamped randomly over it.

